Wednesday, 14 November 2012

DBCC DBRECOVER- Undocumented Command

Hi All,

Today I would like to share about DBCC DBRECOVER which is an undocumented command which I used many times. So thought of sharing, which incident made me to use this command and how it helped me.

Command(Syntax):

DBCC DBRECOVER('DATABASE NAME')

I would like to share two of my examples which made me to use this, will see the incidents now.

Incident-#1

All the datafiles on a particular filegroup has got filled there was no space to grow any more[DB shouldn't be designed like this, It was a non-prod box], during that time SQL Server itself brought the database to Suspect mode. It has written the following error in the SQL Server error logfile.

Error


Incident-#2

Before sql server loads completely some of the application started using the file[applications like virus scanner, System level backup software(like TSM) where exception are not set for the datafiles and logfiles] so when sql server comes up it has noted that it was in use so it marks the database as suspect. It has written the following error in the SQL Server error logfile.

Error

Possible Fix

Possible fix for the incidents noted above will have the following steps to get it fixed.
1. Find the Suspect Database
2. Recover the Suspect DB
3. Check the database Status

1. Find the Suspect Database

We can do it either in GUI or in TSQL.
In GUI the Database will look without Plus (+) symbol as shown below which shows no more action can be performed on that database & the database is suspect.

In TSQL it will work as given below


2. Recover the Suspect DB

We have found the DB in suspect mode and get that fixed, we can try the command which is shown below.


3. Check the database Status

We can do it either in GUI or in TSQL.
In GUI it looks as shown below.


In TSQL run the following command and you can find the status of the database.
This is how DBCC DBRECOVER helped me to recover my suspect DB, Hope it will be helpful to all the readers.

Tuesday, 25 September 2012

SQL Server Installation error due to WMI Services

Today I had a chance to work on a SQL Server Installation failure due to WMI services cannot be started. It was really interesting to work with, So thought of sharing it. 

Error


Reason
The WMI Services on the sevices.msc shows that it is running, when we right clicked on Windows Management Instrumentation services-->Dependencies I have got the error as "WMI: Initialization Failure". It shows clearly that WMI have got corrupted.
 
Possible Fix
Since the WMI has got corrupted, we can try reinstalling the WMI components. Let us see how we can do that.


Step-1
Copy the following command in a notepad and save it as "REINSTALL_WMI.bat"

@echo on
cd /d c:\temp
if not exist %windir%\system32\wbem goto TryInstall
cd /d %windir%\system32\wbem
net stop winmgmt
winmgmt /kill
if exist Rep_bak rd Rep_bak /s /q
rename Repository Rep_bak
for %%i in (*.dll) do RegSvr32 -s %%i
for %%i in (*.exe) do call :FixSrv %%i
for %%i in (*.mof,*.mfl) do Mofcomp %%i
net start winmgmt
goto End
:FixSrv
if /I (%1) == (wbemcntl.exe) goto SkipSrv
if /I (%1) == (wbemtest.exe) goto SkipSrv
if /I (%1) == (mofcomp.exe) goto SkipSrv
%1 /RegServer
:SkipSrv
goto End
:TryInstall
if not exist wmicore.exe goto End
wmicore /s
net start winmgmt
:End

Step-2

Execute the script, while it is getting executed it will show the dependent services for the WMI services and it prompts whether to continue with the Reinstallation operation or not. Proceed with Y if you want to continue.


Once the operation completes the command window closes automatically. Reboot the server and tried with the SQL Server installation and it worked!!! SQL Server Installation went on well and handed over the system to the user.


Reference
There is a blog Post in MSDN Forum which was really helpfull to work with this issue.


Thursday, 6 September 2012

Consistency error due to differential bitmap out-of-sync


Today while working on the backup check I have noticed the checkdb step has got failed in the fullbackup job. I would like to know the reason why it has got failed, so started checking it and the history showed the hint as like data modified is not marked as modified in the differential backup bitmap.

So running the DBCC CHECKDB('RapidApplication_Test') with Physical_only gave me a result as shown below.


The detailed cause of this error is shown below


Cause of the error


We will just have a look at the background, differential bitmaps are used to keep track of which extents have been modified since the last full backup. A differential backup contains all those pages changed since the last full backup.

The page specified has a log sequence number (LSN) that is higher than the differential reference LSN in the BackupManager of the database or the differential base LSN in the file control block of the file, whichever is more recent. However, the page is not marked as changed in the differential backup bitmap.

It can be due to Hardware Failure, I/O error etc... In my cause that day the storage & wintel team was doing some change related to the hardware so that could be the reason for it.

Fix


Since the error gave me a hint about differential bitmap out-of-sync and also there was no other error reported in Checkdb so just taken the Fullbackup by thinking this will reset the differntial bitmap flag. Backup completed Successfully and thought of checking the result of of checkdb, Kudos!! got a clean result.

Target attained then started looking for the next task to work on.

Thursday, 30 August 2012

Remove Data or Log file from a database by moving data from one file to another file.

It was one of the interesting topic which every DBA will across atleast once in their career. I wish to share in this article the ways to move the data from one file[data/log] to the other file[data/log] which belongs to same filegroup. This kind of situation mostly occurs in non-production servers where there is no much transactions running on a database. Let us see how to achieve the goal in a step by step manner by using TSQL & GUI.

In this example I am moving a data from a log file to another logfile of Application_Test database and removing the empty logfile.

TSQL

Step-1

Analyse & understand which file has to be removed.


Step-2

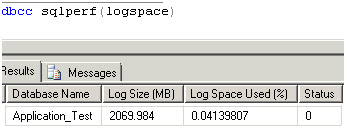
Find the logspace usuage.

Step-3

Empty the logfile with the following command. EMPTYFILE parameter moves data from the specified file to other files in the same filegroup. Because the Database Engine no longer allows data to be placed in the empty file.

Note - In case of datafile it moves the data from one datafile another datafile of a same filegroup, default filegroup of a datafile is Primary filegroup, where as logfile won't have any filegroup as such.

Step-4

Remove the empty logfile with the alter statement.

Step-5

Just check the database and its files.


Yes we have done that. let us see the way we do it using GUI.

GUI

Step-1

Right click the database-->Task-->Shrink-->File and do the required changes as below and click OK.

Step-2

Right click on the database-->Properties-->Files-->select the which we have made it empty -->click on Remove and then click on OK.

Step-3

Once it is done right click on Database-->Properties-->Files. You can find as shown below.

This is how we used to remove a data or a log file from a database.

Tuesday, 21 August 2012

SQL Server Installation Failure due to Corruption in Performance Counter


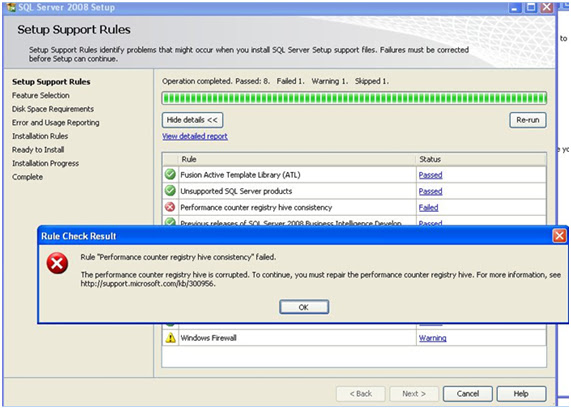
Today when doing SQL Server Installation, I have got the following error. This is because the performance counter registry hive has got corrupted.


By looking at the error we have found that the issue is with the performance counter,  During the SQL Server installation it is trying to check the performance counter registry’s consistency, since the registry hive is corrupted  it is unable to do any of the operation and it is getting failed.

How to fix this now? is our next question, I referred this KB Article which was there in the error message and performed the following steps

In the above steps I have taken the backup of the current registry string and rebuilt the performance registry based on the current registry settings in backup INI files.

Once it is done I just clicked on Rerun button as shown below, and found the operation got completed and gave me a path to go for the next step and finally the installation got completed successfully!!

Here are the information about the other commands which I came across when I was working on this, Hope it will be useful.
LODCTR-It Updates registry values related to performance counters.
Hint-If incase any arguments with spaces is used in the names then the name must be enclosed within double quotation marks.
Different Parameters Usuage:
LODCTR <INI-FileName>
INI-FileName is the name of the initialization file that contains the counter name definitions and explain text for an extensible counter DLL.

LODCTR /S:<Backup_File_Name>
The above command saves the current perf registry strings and info to <Backup_File_Name>

LODCTR /R:<Backup_File_Name>
The above command restores the perf registry strings and info using <Backup_File_Name>

LODCTR /R
The above command rebuild the perf registry strings and info from scratch based on the current registry settings and backup INI files.

LODCTR /D:<Service_Name>
The above command disables the performance counter service.

LODCTR /Q
LODCTR /Q:<Service_Name>
The above command queries the performance counter service information, either query all or specified one.

LODCTR /M:<Counter_Manifest>
The above command installs Windows Vista performance counter provider definition XML file to system repository.

LODCTR /T:<Service_Name>
The above command sets the performance counter service as trusted.

LODCTR /E:<Service_Name>
The above command enables the performance counter service.


Monday, 6 August 2012

Restoration failure due to edition mismatch & its feature limitations

Today, I had a side by side migration which is a Non-Prod Environment. Before doing it on production server, we used to do its corresponding non-prod server. In this type of upgrade we won’t do the SQL Server installation on a new server, we have other team to do the installation as per the customer requirement.
So happily started the event, I was taking backup through litespeed (a compression software which helps to take a compressed backup)from source and started doing the restoration on target server, all the database restoration went out well but on the last one, I got an Error!!! (actually happy to see it).
Error
Msg 62301, Level 16, State 1, Line 0
SQL Server has returned a failure message to LiteSpeed for SQL Server which has prevented the operation from succeeding.
The following message is not a LiteSpeed for SQL Server message. Please refer to SQL Server books online or Microsoft technical support for a solution:

Processed 467664 pages for database ‘Data1’, file 'File1' on file 1.
Processed 64336 pages for database ‘Data2’, file 'File2' on file 1.
Processed 616784 pages for database ‘Data3’, file 'File3' on file 1.
Processed 5 pages for database ‘Data4’, file File4' on file 1.
Database 'DB1' cannot be started in this edition of SQL Server because part or all of object 'Object1' is enabled with data compression or vardecimal storage format. Data compression and vardecimal storage format are only supported on SQL Server Enterprise Edition.


The catch point on the error message is Database 'DB1' cannot be started in this edition of SQL Server because part or all of object 'Object1' is enabled with data compression or vardecimal storage format
Surprised to see because as per standard none of our application database will be having compression or vardecimal storage.  I know that I am working on Standard Edition where as my source is Enterprise Edition. We know that data compression is not available except Enterprise Edition, we can have more idea about the edition supported feature in this article.
So what next I have to restore the database as per the plan. So the plan is:
1. Find the compressed objects
2. Remove the compression
3. Take a backup and restore it on target server

Step-#1(Find the compressed objects)
Restore the same backup on a source server with some other name as DB2 [I cannot make any changes to the source database].
 Run the following “Object Finder” query to identify the objects which are having compression
 SELECT  SCHEMA_NAME(sys.objects.schema_id) AS [SchemaName] 
,OBJECT_NAME(sys.objects.object_id) AS [ObjectName] 
,[rows] ,[data_compression_desc] 
,[index_id] as [IndexID_on_Table]
FROM sys.partitions  INNER JOIN sys.objects 
ON sys.partitions.object_id = sys.objects.object_id 
WHERE data_compression > 0 
AND SCHEMA_NAME(sys.objects.schema_id) <> 'SYS' 
ORDER BY SchemaName, ObjectName

Output


Step-#2 Remove the compression

We can remove the compression with the Index level or table level, In my output above I have both Index and Table level compression so I used both the following queries to uncompress it.
Index level (Syntax):
ALTER INDEX ALL ON <TABLE NAME>REBUILD WITH (DATA_COMPRESSION = None);
Index level (Example):
ALTER INDEX ALL ON Object1 REBUILD WITH (DATA_COMPRESSION = None);

Here is the script, which creates a script that removes the compression from the indexes on those tables listed in the Step-#1

SET NOCOUNT ON
SELECT DISTINCT 'ALTER INDEX '+ '[' + i.[name] + ']' + ' ON ' + '[' + s.[name] + ']' + '.' + '[' + o.[name] + ']' + ' REBUILD WITH (DATA_COMPRESSION=NONE);'FROM sys.objects AS o WITH (NOLOCK)INNER JOIN sys.indexes AS i WITH (NOLOCK)ON o.[object_id] = i.[object_id]
INNER JOIN sys.schemas s WITH (NOLOCK)ON o.[schema_id] = s.[schema_id]
INNER JOIN sys.dm_db_partition_stats AS ps WITH (NOLOCK)ON i.[object_id] = ps.[object_id]
AND ps.[index_id] = i.[index_id]
join sys.partitions
ON sys.partitions.object_id = o.object_id
AND sys.partitions.object_id = i.object_id
AND i.index_id = sys.partitions.index_id
WHERE o.type = 'U' AND i.[index_id] >0
and data_compression in (1,2)

Table level (Syntax):
ALTER TABLE <TABLE NAME>REBUILD WITH (DATA_COMPRESSION = None);
Table level (Example):
ALTER TABLE Object1 REBUILD WITH (DATA_COMPRESSION = None);

Here is the script, which creates a script that removes the compression from the tables listed in the Step-#1

SET NOCOUNT ON
SELECT DISTINCT 'ALTER TABLE ' + '[' + s.[name] + ']'+'.' + '[' + o.[name] + ']' + ' REBUILD WITH (DATA_COMPRESSION=NONE);'FROM sys.objects AS o WITH (NOLOCK)INNER JOIN sys.indexes AS i WITH (NOLOCK)ON o.[object_id] = i.[object_id]
INNER JOIN sys.schemas AS s WITH (NOLOCK)ON o.[schema_id] = s.[schema_id]
INNER JOIN sys.dm_db_partition_stats AS ps WITH (NOLOCK)ON i.[object_id] = ps.[object_id]
AND ps.[index_id] = i.[index_id]
join sys.partitions
ON sys.partitions.object_id = o.object_id
AND sys.partitions.object_id = i.object_id
AND i.index_id = sys.partitions.index_id
WHERE o.[type] = 'U'and data_compression in (1,2)

Step-#3 Take a backup and restore it on target server
Cross check with “Object Finder” script is there any more compressed tables on the database, there were no rows retuned from the scripts. So Just taken a backup and did a restore on a target server.

Carried out all other subtask to complete the migration then sent an email to the customer stating that migration has completed successfully & sent a note about compression too.

Note:  Here is the script to find the objects which has vardecimal  data types
SELECT OBJECTPROPERTY(OBJECT_ID(<object name(s) from Object Finder output>), 'TableHasVarDecimalStorageFormat') ;